


Form handling in React without using any library is a tedious task. What we have been taught before is mapping states to input fields and using the state setter in the onChange function of the input field. This method works, but is tedious to manage in a production-level application (for example, the applications with forms with many input fields). Creating and mapping state to every input field for form management in React doesn't make sense.
Thankfully, many amazing developers are out in the community, constantly contributing to the React ecosystem, and have created amazing form-handling libraries to use in your React project. One of them is react-hook-form. This package helps us to create and maintain forms in a very simple and scalable manner.
In this article, we will first look at the traditional way of form handling, where we map state to input fields and perform form validation manually. Then, we will use react-hook-form to create the same form and check for ourselves which method is simpler and scalable for production-level applications.
Creating a React Application
You may skip this part if you already have some sort of React application set up. We will use Next.js for this tutorial as we don’t need to worry about routing in this case. To create a Next.js application, use the following command:
npx create-next-app <app-name>
Feel free to choose your own app name here. In this tutorial, we have used the app router, the latest and currently standard router Next.js works with. We also choose to install Tailwind CSS for basic styling and use all the default configurations the Next.js installation wizard suggests.
Also, make sure that you use TypeScript, as we will be dealing with zod and it works best with TypeScript.
Now, before we get started, let’s clean the default styling. Go to globals.css, and only have the following contents in the file:
@tailwind base;
@tailwind components;
@tailwind utilities;
Installing packages
Now, let’s install some packages that will help us throughout this article:
npm install react-hook-form zod @hookform/resolvers
Using the above command, we are installing the following commands:
react-hook-form: We will use this package to create forms easily in our application.zod: We will use this package to define the validation rules for our form.@hookform/resolvers: We will use this package to connect our zod-defined validation rules to the form we create usingreact-hook-form.
Now that we have installed all the necessary packages, we can proceed to creating our form in the traditional way and then using react-hook-form.
Using states to create a form
Now, let’s use the traditional way to create a form. We are going to create a user registration form asking for first name, last name, email, password and password confirmation. Have the following contents under page.tsx file under the app directory.
"use client";

import { useState } from "react";

export default function Traditional() {
  const [email, setEmail] = useState<string>("");
  const [password, setPassword] = useState<string>("");
  const [confirmPassword, setConfirmPassword] = useState<string>("");
  const [firstName, setFirstName] = useState<string>("");
  const [lastName, setLastName] = useState<string>("");

  function onSubmit(e: React.FormEvent<HTMLFormElement>) {
    e.preventDefault();

    if (!email || !password || !confirmPassword || !firstName || !lastName) {
      return alert("Please fill out all fields");
    }
    if (password !== confirmPassword) {
      return alert("Passwords do not match");
    }

    alert("User created successfully!");
  }

  return (
    <div className="p-10">
      <form className="space-y-5" onSubmit={onSubmit}>
        <div>
          <input
            className="border border-black px-5 py-3"
            placeholder="Email"
            type="email"
            value={email}
            onChange={(e) => setEmail(e.target.value)}
          />
        </div>
        <div>
          <input
            className="border border-black px-5 py-3"
            placeholder="Password"
            type="password"
            value={password}
            onChange={(e) => setPassword(e.target.value)}
          />
        </div>
        <div>
          <input
            className="border border-black px-5 py-3"
            placeholder="Confirm Password"
            type="password"
            value={confirmPassword}
            onChange={(e) => setConfirmPassword(e.target.value)}
          />
        </div>
        <div>
          <input
            className="border border-black px-5 py-3"
            placeholder="First Name"
            type="text"
            value={firstName}
            onChange={(e) => setFirstName(e.target.value)}
          />
        </div>
        <div>
          <input
            className="border border-black px-5 py-3"
            placeholder="Last Name"
            type="text"
            value={lastName}
            onChange={(e) => setLastName(e.target.value)}
          />
        </div>
        <button type="submit" className="bg-black text-white px-5 py-3">
          Submit
        </button>
      </form>
    </div>
  );
}
In the above code, we are doing the following:
We are telling Next.js that this is a client component and not a server component by mentioning
”use client”;on the top of the file.We are creating five states (
email,password,confirmPassword,firstName,lastName) to keep track of respective input fields.We are creating a form using the
<form>tag, with the form action being theonSubmit()function.For each input field, we are mapping the respective state. We are setting the
valueas the actual state value, and using theonChangeattribute to use the respective state setters to update the state with the current state of the input field whenever it’s interacted with.In the
onSubmit()function, we are preventing the usual form submit behaviour and, in turn, disabling page reload by usinge.preventDefault().We are then performing validation to make sure all fields are filled out.
We are also performing validation to check if
passwordandconfirmPasswordmatches.
Now, there are a few takeaways from this method:
For each input field, there needs to be a state inside the respective component. For smaller forms it’s quite easy to manage. But for larger forms, it will be chaotic with many states.
We are performing validation inside the
onSubmit()function. In case of any error, we are displaying an alert. For any large form, red text must be near the input field of concern for better UX, not an alert box. To achieve that, using this method, each input field must have another state for any errors, and then these errors must be set using the state in theonSubmit()function. I don’t know about you, but this sure sounds super tedious to me.
Now, let’s see how react-hook-form fixes these issues and provides a better form experience overall.
Using react-hook-form to create a form
Creating a form using this method requires two steps: creating a zod schema, defining the form validation rules, and creating the form based on the zod schema.
Creating zod validation schema
In the src directory, create a new directory called types and create a file called input.ts within this directory. We will create our zod schema in this file. Have the following contents in the file:
import { z } from "zod";

const registerInputSchema = z
  .object({
    email: z.string().min(1, "Email is required").email(),
    password: z
      .string()
      .min(5, "Password should be minimum 5 characters")
      .max(15, "Password should not exceed 15 characters"),
    confirmPassword: z
      .string()
      .min(5, "Password should be minimum 5 characters")
      .max(15, "Password should not exceed 15 characters"),
    firstName: z.string().min(1, "First name is required"),
    lastName: z.string().min(1, "Last name is required"),
  })
  .refine((data) => data.password === data.confirmPassword, {
    message: "Passwords do not match",
    path: ["confirmPassword"],
  });

type RegisterInput = z.infer<typeof registerInputSchema>;

export { registerInputSchema };

export type { RegisterInput };
In the above code, we are doing the following:
We are creating a zod schema for all of the input fields we are going to create in the form.
We are specifying the specific validation rules for each field. For example, for
email, the rules are:it must be a string
it is a required field (minimum characters 1)
it must be an email (follow the email format)
For
passwordandconfirmPasswordfields, we have a rule that the passwords must be between 5 and 15 characters in length.For
firstNameandlastNamewe have a minimum character requirement of 1 to make the field required.We are using
refineon the schema to add validation further to check ifpasswordandconfirmPasswordmatch. If not, an error will be shown on theconfirmPasswordfield.We are creating a type based on the schema for type-safety during the creation of the form.
Finally, we are exporting the schema and the type so that we can use those in our component.
Now, let's create a separate page in our application for the react-hook-form method.
Creating the form
Create a new folder under the app directory called rhf. Within this new folder, create a new file called page.tsx. Have the following contents in the file:
"use client";

import { useForm } from "react-hook-form";
import { registerInputSchema } from "@/types/inputs";
import type { RegisterInput } from "@/types/inputs";
import { zodResolver } from "@hookform/resolvers/zod";

export default function RFH() {
  const {
    register,
    formState: { errors },
    handleSubmit,
  } = useForm<RegisterInput>({
    resolver: zodResolver(registerInputSchema),
  });

  function onSubmit(data: RegisterInput) {
    console.log(data);
    alert("User created successfully!");
  }

  return (
    <div className="p-10">
      <form className="space-y-5" onSubmit={handleSubmit(onSubmit)}>
        <div>
          {errors.email && (
            <p className="text-red-600">{errors.email.message}</p>
          )}
          <input
            className="border border-black px-5 py-3"
            placeholder="Email"
            type="email"
            {...register("email")}
          />
        </div>
        <div>
          {errors.password && (
            <p className="text-red-600">{errors.password.message}</p>
          )}
          <input
            className="border border-black px-5 py-3"
            placeholder="Password"
            type="password"
            {...register("password")}
          />
        </div>
        <div>
          {errors.confirmPassword && (
            <p className="text-red-600">{errors.confirmPassword.message}</p>
          )}
          <input
            className="border border-black px-5 py-3"
            placeholder="Confirm Password"
            type="password"
            {...register("confirmPassword")}
          />
        </div>
        <div>
          {errors.firstName && (
            <p className="text-red-600">{errors.firstName.message}</p>
          )}
          <input
            className="border border-black px-5 py-3"
            placeholder="First Name"
            type="text"
            {...register("firstName")}
          />
        </div>
        <div>
          {errors.lastName && (
            <p className="text-red-600">{errors.lastName.message}</p>
          )}
          <input
            className="border border-black px-5 py-3"
            placeholder="Last Name"
            type="text"
            {...register("lastName")}
          />
        </div>
        <button type="submit" className="bg-black text-white px-5 py-3">
          Submit
        </button>
      </form>
    </div>
  );
}
In the above code, we have created the form using react-hook-form. Let's see what we have done here step-by-step.
We are using the
useFormhook imported fromreact-hook-formand restructuringregister,formState: { errors }andhandleSubmit.registerwould be used for every input field we create so thatreact-hook-formcan configure and track the input field.errorswill contain any validation errors caused in any specific input field.handleSubmitwill be used to call a function after all validation is passed.We are providing the exported type
RegisterInputto theuseFormhook to obtain type safety throughout the creation of the form.We are using the
zodResolverfrom@hookforms/resolvers/zodto connect our zod schema to the form instance so that all the validations for the input fields are performed automatically.For the form
onSubmitwe are usinghandleSubmit(onSubmit)so that theonSubmit()function is only executed after all validation checks have passed after the form is submitted.For each input field in the form, we are adding
{...register("<name>")}where<name>corresponds to the field name in the zod schema. This wayreact-hook-formcan add necessary props to the input field.
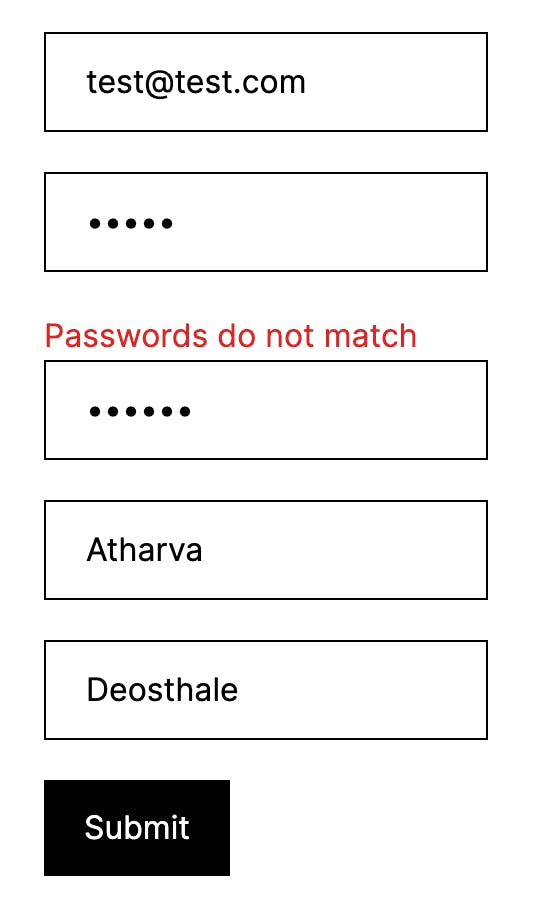
Once you submit the form with errors, you won't see an alert box. Instead, you will see errors right above the input field in red colour.
You'll also notice that we aren't using states at all in the component. If you want to add another input field or change the validation rules, you can do that directly in the zod schema we created earlier and change the input fields accordingly.
Conclusion
React hook form makes it much easier for you to create forms in a production-level React application. Should you use it for smaller applications with forms only having one or two input fields? Probably not, but you certainly can. One thing's for sure- for large forms or a production-level application, this package will help a ton.
I hope you received value from this article! Please share it with your friends and subscribe to the newsletter if you'd love to see more articles from me in your inbox.