


Since token standards started being well-known in the community, people have come up with different tokens and used them for many things- gaming, custom currency, and much more. Creating an ERC-20 token is not a difficult task. You can either use toolings like thirdweb, which allows you to deploy such tokens in no time without any code, or OpenZeppelin, which provides you with libraries to assist you in creating your token with as less coding as possible. But have you ever wondered how an ERC-20 token works under the hood? For most people, it doesn't matter, although, as developers, we must know how it works under the hood as we are responsible for making these things and ensuring they are as secure as possible.
Creating an ERC-20 smart contract from scratch without using OpenZeppelin can be challenging but rewarding for experienced Ethereum developers. This article will create a simple ERC-20 contract that adheres to the ERC-20 standard without relying on pre-existing frameworks or libraries.
If you prefer a video tutorial, I have uploaded a video about writing an ERC-20 token from scratch on my YouTube channel.
About ERC-20 standard
First, let's define what an ERC-20 contract is and what the ERC-20 standard entails. ERC-20 is a technical standard that defines a set of rules for implementing a token on the Ethereum blockchain. These rules include the token's name, symbol, decimal places, and the functions that must be implemented for the token to be considered ERC-20 compliant. This standard allows for the creation of interoperable tokens that can be easily exchanged on the Ethereum network.
For more information about the functions and events included for a contract to be classified as an ERC-20 token, check out the official docs on ethereum.org. We will be following the standard specified in those docs in this tutorial. I'd recommend keeping that page open in a tab while following this tutorial.
Now, let's dive in and make our ERC-20 token!
Writing our contract
Creating hardhat project
We will use hardhat in this tutorial to compile and manage our contract. Navigate to a safe directory, and run the following command to initialize the hardhat project initialization wizard:
npx hardhat
This should load up the initializer. Choose your configuration; in this case, I'll be choosing JavaScript (although we won't be writing scripts in this tutorial, although if you wish to do so, this choice might be important for you). Finally, choose to install the dependencies for your hardhat project.
Creating a smart contract
Now, in the contracts folder, create a new file named ERC20.sol. This will be the smart contract file we will work on in this tutorial. Now let's proceed with writing the contract.
Create the basic structure for a smart contract:
// SPDX-License-Identifier: MIT
pragma solidity ^0.8.9;

contract ERC20 {

}
Defining the states
Now, let's define the states we will use in the contract- these are typically data such as user balances, token names, symbols, and other data. Some of these are listed on the ERC-20 docs- look at them so that you understand why we are adding these in the state.
// SPDX-License-Identifier: MIT
pragma solidity ^0.8.9;

contract ERC20 {
    string public name;
    string public symbol;
    uint8 public immutable decimals;
    uint256 public immutable totalSupply;
    mapping(address => uint256) _balances;
    // spender => (owner => no of tokens allowed)
    mapping(address => mapping(address => uint256)) _allowances;

    event Transfer(address indexed _from, address indexed _to, uint256 _value);
    event Approval(address indexed _owner, address indexed _spender, uint256 _value);
}
In the above code, we define the states necessary- token name, symbol, decimals of the token, total supply of the token, user balances, allowances and the events that can be later emitted.
If you look at the ERC-20 docs, you will notice we have functions for name(), symbol(), decimals() and totalSupply(). However, we don't need to create separate functions since the variables are public and can be called a function by default.
If you don't know what allowances are, you can allow someone to spend tokens on your behalf. Although, you need to approve the number of tokens beforehand. We will be creating the necessary functions later in the tutorial.
Creating the constructor
Let's create a constructor to initialize all the data as soon as the contract is deployed on the chain.
constructor(string memory _name, string memory _symbol, uint256 _totalSupply) {
    name = _name;
    symbol = _symbol;
    decimals = 18;
    totalSupply = _totalSupply;
    _balances[msg.sender] = _totalSupply;
}
In the above code field, we create a constructor that inputs the token's name, symbol and total supply and initializes all the values. We also assign the total supply as the balance for the contract deployer so that the minted tokens aren't lost after deployment and are usable.
Creating the balanceOf() function
Let's create a function to get the balance of a specific wallet/contract address. This function also complies with the ERC-20 standards.
function balanceOf(address _owner) public view returns(uint256) {
    require(_owner != address(0), "!ZA");
    return _balances[_owner];
}
In the above code, we check if the address provided is a zero address and revert the transaction if so. If not, we will return the balance of the user by accessing the _balances mapping.
Creating the transfer() function
Let's create the transfer function to help token holders transfer their tokens to other wallets/contracts.
function transfer(address _to, uint256 _value) public returns(bool) {
    require((_balances[msg.sender] >= _value) && (_balances[msg.sender] != 0), "!Bal");
    _balances[msg.sender] -= _value;
    _balances[_to] += _value;
    emit Transfer(msg.sender, _to, _value);
    return true;
}
In the above code block, we check if the transaction sender (also the token sender) has enough token balance to afford this transaction and revert if the sender has insufficient balance.
Then, we access the _balances mapping and subtracting the amount from the sender and adding the same amount to the receiver. That way, the balance will reduce when sending tokens to other wallets/contracts.
We then emit a Transfer() event that is part of the ERC-20 standard events. This can help apps to listen when any transfers are made on your token.
Creating the transferFrom() function
This function is similar to the transfer() function, although we use this function to send funds on behalf of other wallets. For this, allowances must be set by a wallet that intends to allow its tokens to be transferred by other wallets.
function transferFrom(address _from, address _to, uint256 _value) public returns(bool) {
    require(_allowances[msg.sender][_from] >= _value, "!Alw");
    require((_balances[_from] >= _value) && (_balances[_from] != 0), "!Bal");
    _balances[_from] -= _value;
    _balances[_to] += _value;
    _allowances[msg.sender][_from] -= _value;
    emit Transfer(_from, _to, _value);
    return true;
}
In the above code, we are checking if the transaction sender has enough permissible allowance to send tokens from another wallet, and we perform the same tasks as transfer() function, but the wallet chosen to send from will be affected by balance changes and not the transaction sender.
We also reduce the permissible allowance by the number of tokens sent in this transaction. This way, nobody can spam the allowance logic and get all the tokens.
Creating the approve() function
Let's create a function that allows the token holder to set allowances for other wallets to transfer their tokens.
function approve(address _spender, uint256 _value) public returns(bool) {
    require(_balances[msg.sender] >= _value, "!Bal");
    _allowances[_spender][msg.sender] = _value;
    emit Approval(msg.sender, _spender, _value);
    return true;
}
In the above code, we check if the token holder has enough balance for the required allowance and revert if not. Then we are setting the allowance by making changes to the _allowances mapping. Finally, we are emitting an Approval() event so that apps can listen to this event.
Creating the allowance() function
Let's create a function that lets the token holder access their remaining allowance.
function allowance(address _owner, address _spender) public view returns(uint256) {
    return _allowances[_spender][_owner];
}
The above function is pretty straightforward. We access the _allowance mapping and return a spender's allowance for a token holder.
Final code
Here's the full code for the ERC-20 contract.
// SPDX-License-Identifier: MIT
pragma solidity ^0.8.9;

contract ERC20 {
    string public name;
    string public symbol;
    uint8 public immutable decimals;
    uint256 public immutable totalSupply;
    mapping(address => uint256) _balances;
    mapping(address => mapping(address => uint256)) _allowances;

    event Transfer(address indexed _from, address indexed _to, uint256 _value);
    event Approval(address indexed _owner, address indexed _spender, uint256 _value);

    constructor(string memory _name, string memory _symbol, uint256 _totalSupply) {
        name = _name;
        symbol = _symbol;
        decimals = 18;
        totalSupply = _totalSupply;
        _balances[msg.sender] = _totalSupply;
    }

    function balanceOf(address _owner) public view returns(uint256) {
        require(_owner != address(0), "!ZA");
        return _balances[_owner];
    }

    function transfer(address _to, uint256 _value) public returns(bool) {
        require((_balances[msg.sender] >= _value) && (_balances[msg.sender] != 0), "!Bal");
        _balances[msg.sender] -= _value;
        _balances[_to] += _value;
        emit Transfer(msg.sender, _to, _value);
        return true;
    }

    function transferFrom(address _from, address _to, uint256 _value) public returns(bool) {
        require(_allowances[msg.sender][_from] >= _value, "!Alw");
        require((_balances[_from] >= _value) && (_balances[_from] != 0), "!Bal");
        _balances[_from] -= _value;
        _balances[_to] += _value;
        _allowances[msg.sender][_from] -= _value;
        emit Transfer(_from, _to, _value);
        return true;
    }

    function approve(address _spender, uint256 _value) public returns(bool) {
        require(_balances[msg.sender] >= _value, "!Bal");
        _allowances[_spender][msg.sender] = _value;
        emit Approval(msg.sender, _spender, _value);
        return true;
    }

    function allowance(address _owner, address _spender) public view returns(uint256) {
        return _allowances[_spender][_owner];
    }
}
Deploying and testing the contract
Typically to deploy and test the contract functions, you'll need to write scripts and add private keys to your environment variables to deploy and interact with the contract. However, thirdweb deploy provides an easy and interactive workflow for deploying your contracts on the blockchain without exposing your private keys - and it's FREE! You don't need any additional setup- run the following command in the terminal to begin deploying the contract.
npx thirdweb@latest deploy
This command will do all the hard work- compiling the contract and uploading the data to IPFS, and then you will be redirected to your browser to pass in the parameters to deploy the contract finally.
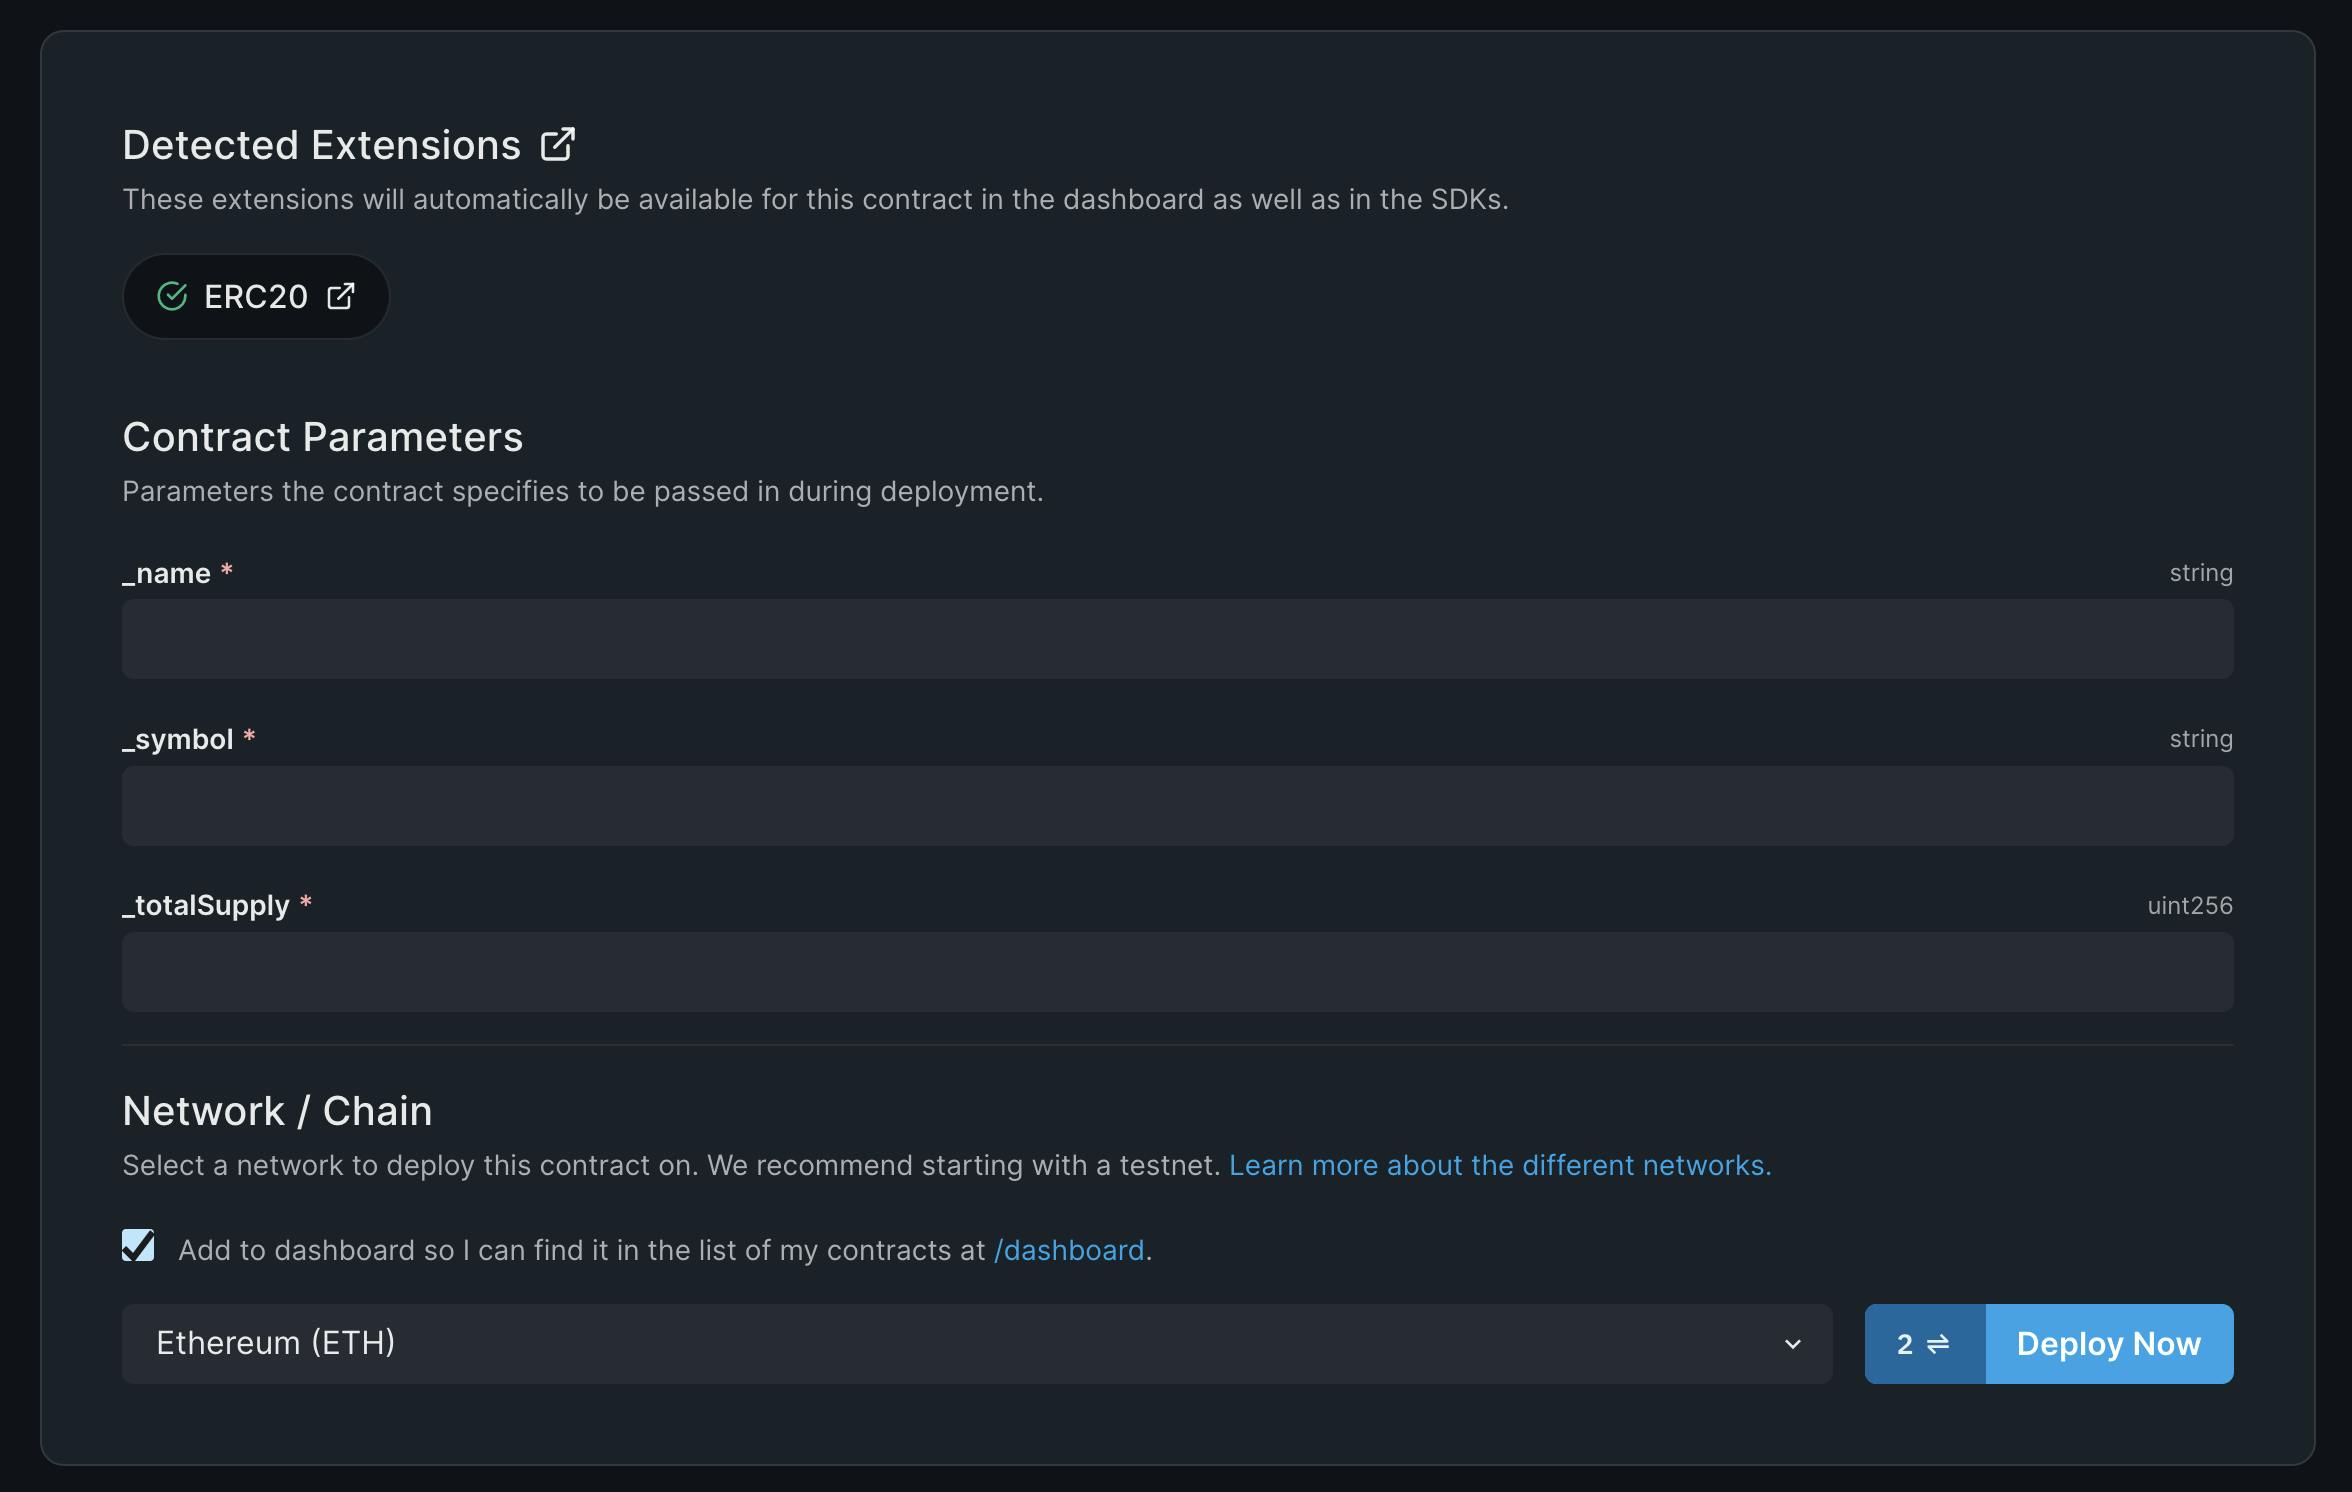
Also, as you can see, thirdweb detects that this is indeed an ERC-20 token as it follows the standards that need to be satisfied for a contract to be classified as an ERC-20 token. You can now enter the information in the parameters. Note that in _totalSupply you need to add 18 zeros after your total supply amount because we use 18 decimals in this token contract.
You can now choose your desired chain and click on Deploy Now. This should initiate a transaction request on your chosen provider (MetaMask, WalletConnect, etc.). After completing the deployment, you should be redirected to the contract dashboard. Choose Tokens from the top menu, and you should see the following interface.
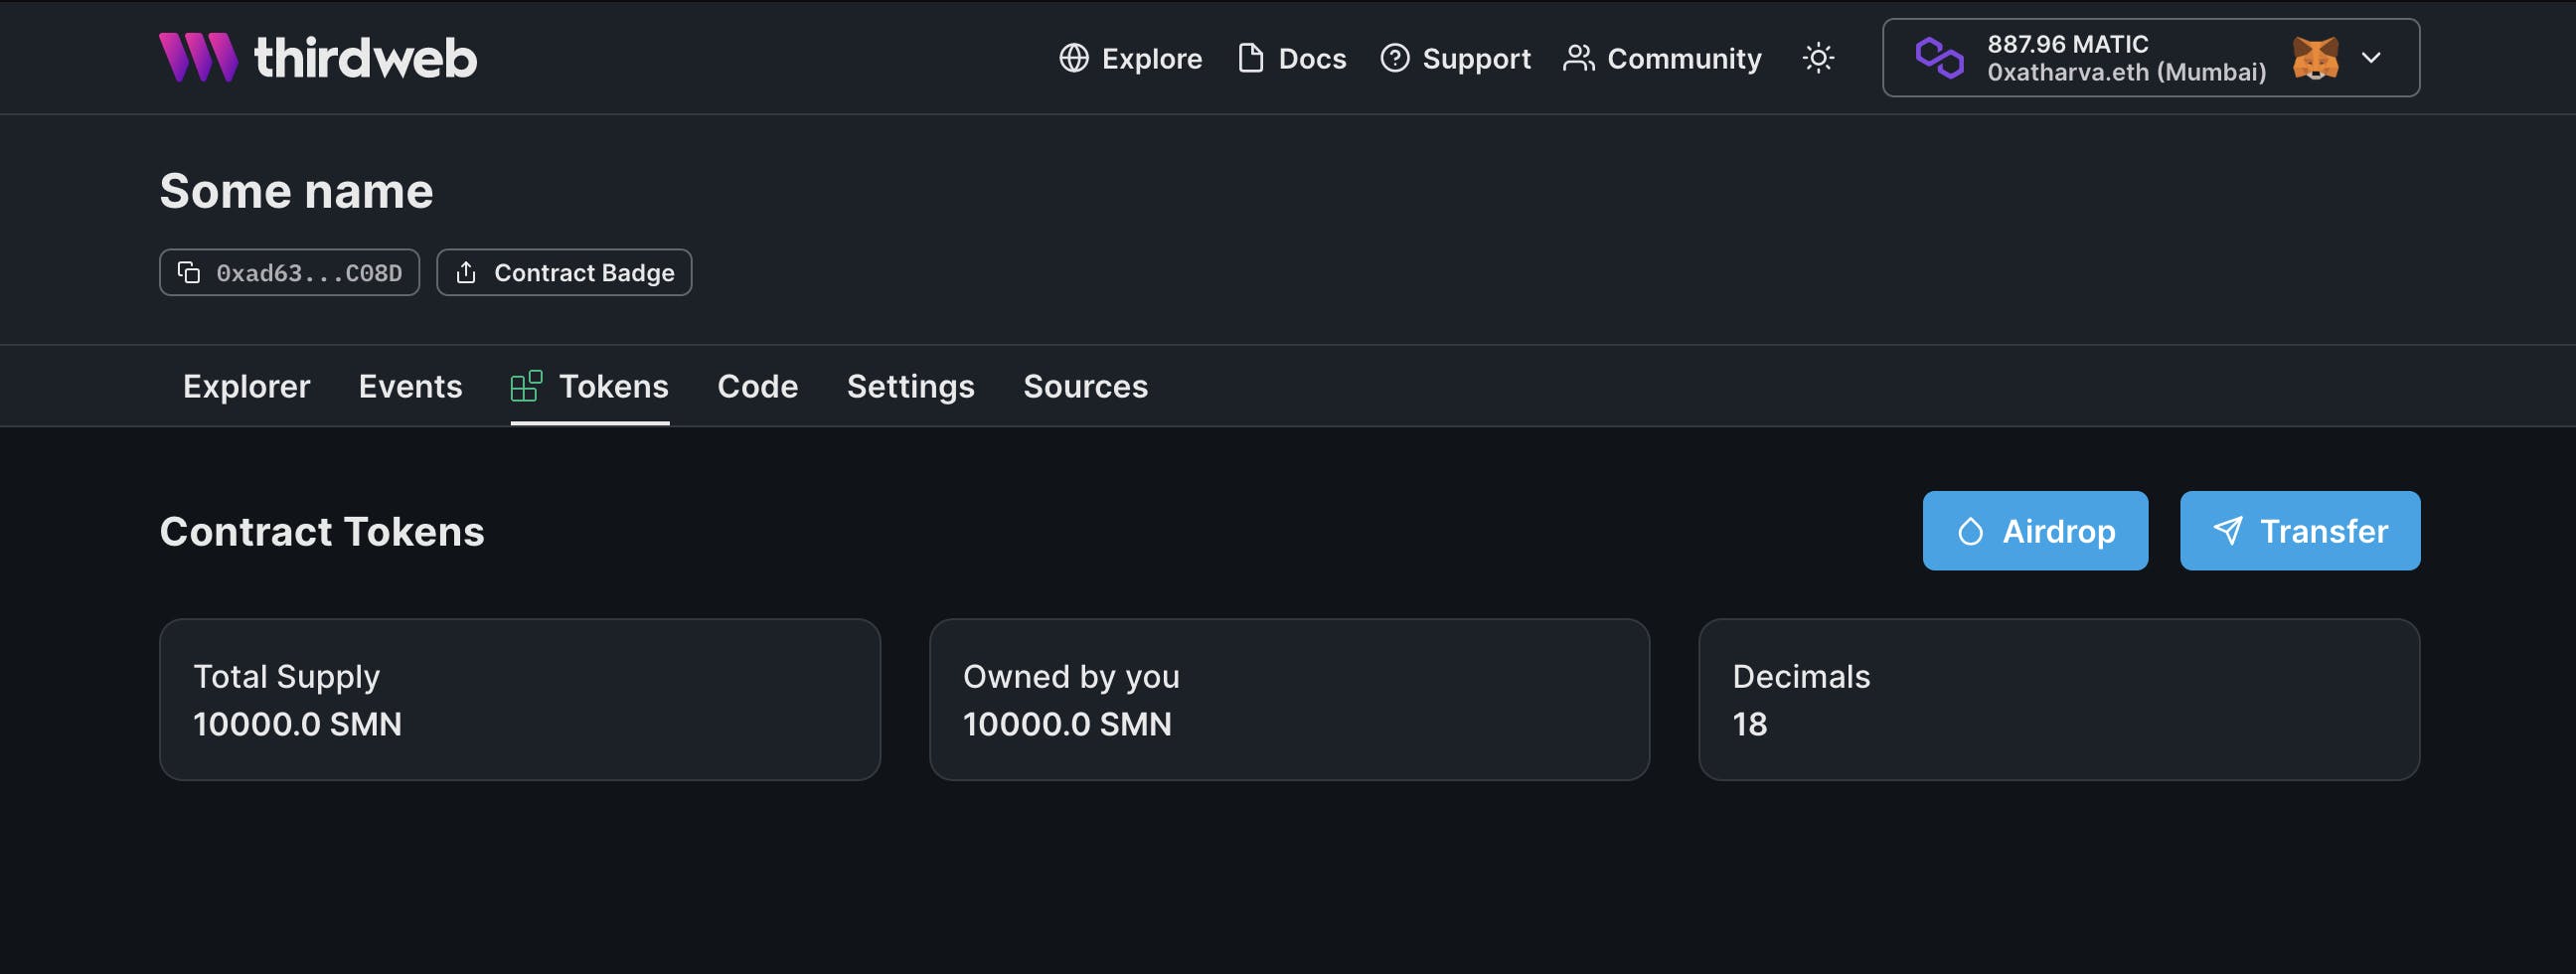
You can see all the data about your contract- the total supply, decimals, tokens owned by the connected wallet, airdrop and transfer tokens functionality. You can also use the Explorer tab to interact with each of the functions without writing a script to do so.
Watch my video on writing ERC-20 tokens from scratch to know more and test your contract. There we test this token using the contract explorer.
Conclusion
In this article, we saw how to write an ERC-20 token from scratch and deploy it using thirdweb. I hope this article explained how these tokens work under the hood and how every line is very important. If you have any questions or feedback, feel free to comment below or reach out to me on other platforms.